Clustering: Setting Up
1. Preparing the Environment
Before setting up clustering in CompleteFTP, ensure that your environment meets all the necessary prerequisites.
1.1 Installation
-
Install CompleteFTP Enterprise MFT on all machines that will participate in the cluster, including both the primary and secondary servers.
1.2 Network Configuration
-
Verify that the primary and secondary servers can communicate over the network.
-
Open the necessary ports in your firewall settings to allow communication between servers. By default, CompleteFTP uses the SFTP protocol for server-to-server communication, which requires port 14983 to be open.
1.3 Adjusting IP Filters
By default, secondary servers may only permit connections from localhost or LAN IP addresses. To allow the primary server to communicate with secondary servers, adjust the IP filtering rules on each secondary server:
-
Open CompleteFTP Manager on the secondary server.
-
In the bottom-left corner, click on the Options menu and select Show system users/folders/sites.
-
Navigate to the Sites panel and select the Admin Site.
-
In the IP Filtering section, add a rule that allows connections from the primary server's IP address.
2. Configuring the Primary Server
2.1 Designating the Primary Server
The primary server is the central point for configuration management in the cluster. To designate a server as the primary:
-
Open CompleteFTP Manager and connect to the server you intend to use as the primary server.
2.2 Enabling Clustering
To enable clustering on the primary server:
-
In CompleteFTP Manager, navigate to the Overview panel.
-
Locate the Servers window, which is used to control the servers in the cluster.
-
Click on the Add server link. This action will automatically designate the current server as the primary server.
2.3 Synchronization Settings
After adding secondary servers (described in the next section), you can configure synchronization settings:
-
Ensure that the Sync enabled option is checked for automatic synchronization of configuration changes to secondary servers.
-
The default synchronization frequency is every 60 seconds. You can adjust this interval if necessary by modifying the synchronization settings in the Servers panel.
3. Adding Secondary Servers
3.1 Step-by-Step Process
To add a secondary server to the cluster, follow these steps:
-
In CompleteFTP Manager connected to the primary server, navigate to the Servers panel.
-
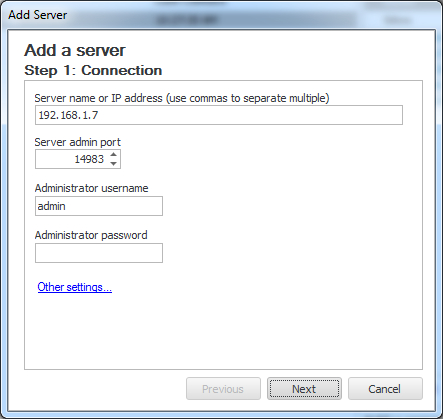
Click on the Add server link to open the Add Server dialog box.
-
Enter the secondary server's details:
- Hostname/IP Address: The network address of the secondary server.
- Port: The port number for the admin protocol (default is 14983 for SFTP).
- Username: The username of an administrative user on the secondary server (usually admin).
- Password: The password for the administrative user.
-
Click Next to proceed to the registration summary.
-
Review the settings and click Add to add the secondary server to the cluster.
-
A progress report will be displayed, detailing the registration process. The secondary server's configuration will be overwritten with a copy of the primary server's configuration.
3.2 Post-Addition Tasks
After successfully adding a secondary server:
-
Verify that the secondary server appears in the Servers list in the Overview panel.
-
Check the Last synchronized column to confirm that the secondary server has been synchronized with the primary server's configuration.
3.3 Troubleshooting Tips
If you encounter issues when adding a secondary server:
-
Check IP Filters: Ensure that the IP filtering rules on the secondary server allow connections from the primary server's IP address.
-
Firewall Settings: Verify that firewalls on both servers are configured to allow communication on the necessary ports (default is 14983 for SFTP).
-
Admin User Credentials: Confirm that the admin user exists on the secondary server and that you have entered the correct username and password.
-
Network Connectivity: Test the network connection between the primary and secondary servers to ensure they can communicate.
4. Configuring the Load Balancer
To distribute client requests across the servers in the cluster, configure your load balancer accordingly:
-
Set Up Load Balancing: Configure the load balancer to distribute incoming client connections among the primary and secondary servers. The method of distribution (e.g., round-robin, least connections) can be chosen based on your requirements.
-
Health Checks: Implement health checks to monitor the availability of each server. This ensures that the load balancer directs traffic only to servers that are operational.
4.2 Protocol Considerations
Different protocols may have specific considerations when configuring the load balancer:
HTTP/S
-
Session Stickiness (Sticky Sessions): HTTP/S sessions are maintained per server. Configure the load balancer to use sticky sessions based on the client's IP address or cookies to ensure that all requests from the same client are directed to the same server. This is important to maintain session continuity.
Other Protocols (FTP, SFTP, FTPS)
-
Standard Load Balancing: These protocols are generally stateless or handle state within each connection, so standard load balancing techniques can be applied without special considerations.
Ensure that your load balancer is configured to handle the specific requirements of each protocol used by your CompleteFTP servers.