CompleteAgent is a cross-platform client that is designed to perform robust, automatic uploads and downloads to and from CompleteFTP. CompleteAgent can run as a standalone application on Windows and Linux, but on Windows is typically run as a service. It monitors a designated local folder for new files and securely uploads them to a specified CompleteFTP server when they appear. It also monitors a designated remote folder for new files, and securely downloads them to a local directory.
CompleteAgent is a free client application that requires an Enterprise MFT server to connect to. It can be freely installed on any machine. As well as being a Windows service, CompleteAgent includes a .NET standard binary that can be run on any platform (including Linux) that supports .NET standard.
CompleteAgent is installed as part of the CompleteFTP trial, and is optionally installed by the production installer. In both cases, it is installed as a Windows service, but only the trial starts the service running.
CompleteAgent requires user credentials to connect to the user - the trial creates a user called completeAgent, and sets up a private key, so that it is ready to go once the trial is installed. The trial also is set up to monitor a remote directory called downloads in the completeAgent user's home directory - see the configuration file. This directory will need to be created on the server and files placed in it for automatic downloads to begin.
By default, CompleteAgent is installed in a subdirectory of the main CompleteFTP installation directory, called CompleteAgent. Typically then, it can be found at C:\Program Files\Complete FTP\CompleteAgent. The Windows-specific binaries are found in the net subdirectory, while the cross-platform .NET standard binaries are found in standard.
The main configuration file for CompleteAgent is found at C:\ProgramData\Enterprise Distributed Technologies\CompleteAgent\CompleteAgent.ini. The various options that can be set in the configuration file are also available as command-line options if the binary is run from the command-line rather than as a service. The long names of the command-line options are the same names used in the configuration file.
If the configuration file is altered, the CompleteAgent service must be restarted.
Although CompleteAgent is installed as a Windows service, it can also be run from the command-line - and installed as a Windows service from the command-line.
install - install CompleteAgent as a Windows service
uninstall - uninstall the CompleteAgent service
start - start the CompleteAgent service
stop - stop the CompleteAgent service
The options below are used when running CompleteAgent from the command-line. Please note that these options have changed slightly from the original 1.0 options (which was when CompleteAgent only supported uploads). For example, RootDirectoryPath is now RootDirectory. Most of the settings are not required as they have defaults.
The most important options are shown below, and can also be obtained to running Completeagent.exe on the command line with the -h option. The -hh option displays the less frequently used options.
-rd or -RootDirectory - the base directory under which all files and directories will be placed by default - defaults to C:\ProgramData\Enterprise Distributed Technologies\CompleteAgent
-s or -ServerAddress - IP address or host-name of server
-sp or -ServerPort - server port - defaults to 22
-u or -UserName - user-name of account on server
-p or -Password - password of account on server
-kf or -PrivateKeyFilePath - path of private key file to use
-kp or -PrivateKeyPassword - password for private key file
-su or -RemoteUploadDir -  remote target directory on server for uploads - defaults to user's home directory
-sd or -RemoteDownloadDir - remote target directory on server for polling for downloads - if not supplied, no polling for downloads is initiated
-l or -LogLevel - logging level (All, Debug, Information, Warning, Error) - defaults to Information
-h or -help - show help for most important options
-hh - show help for all options
By default, CompleteAgent is configured to detect files being placed in C:\ProgramData\Enterprise Distributed Technologies\CompleteAgent\Uploads\ToBeUploaded. Once files are placed here, they are securely uploaded to the location specified in the configuration, using the named user and their credentials.
Successfully uploaded files are moved to the C:\ProgramData\Enterprise Distributed Technologies\CompleteAgent\Uploads\Completed. If an upload fails, the file is eventually moved to C:\ProgramData\Enterprise Distributed Technologies\CompleteAgent\Uploads\Failed. Diagnostic information on the failure can be found in the logs, which are written to C:\ProgramData\Enterprise Distributed Technologies\CompleteAgent\Logs.
If CompleteAgent is configured for automatic downloads, when found on the remote server, files are initially downloaded into the C:\ProgramData\Enterprise Distributed Technologies\CompleteAgent\Downloads\InProgress directory. When the download has successfully completed, the file will be moved into C:\ProgramData\Enterprise Distributed Technologies\CompleteAgent\Downloads\Completed. If a download fails, the file is moved to C:\ProgramData\Enterprise Distributed Technologies\CompleteAgent\Downloads\Failed. In the case of a failure, this will generally be a partially downloaded file. Diagnostic information on the failure can be found in the logs.
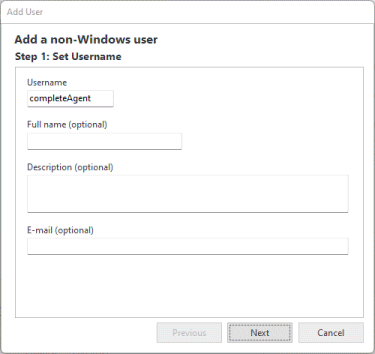
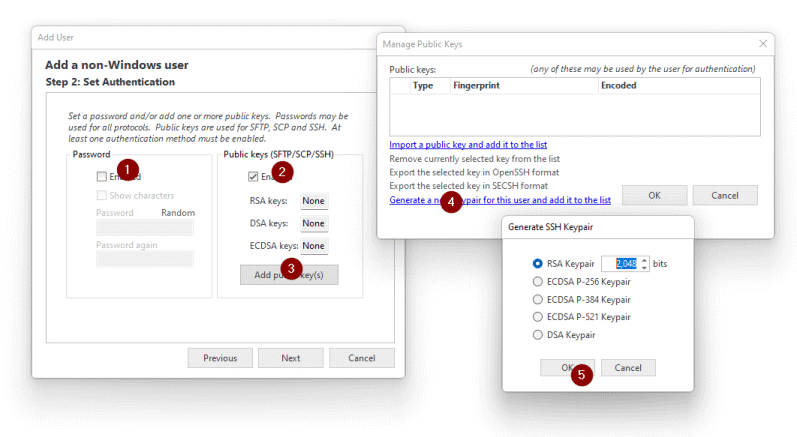
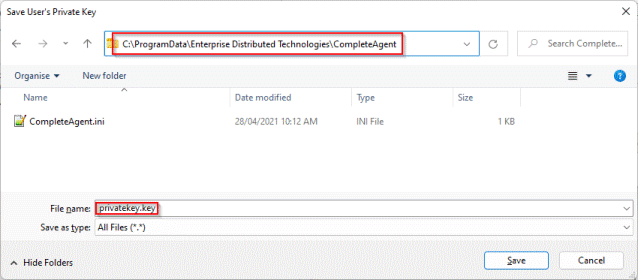
Instances of CompleteFTP that were initially installed using the production installer (rather than the trial installer) don't have an account set up for CompleteAgent, so it's necessary to create such an account before starting the CompleteAgent Service. By default, the CompleteAgent configuration file authenticates using the username, completeAgent, using a private key that's in the CompleteAgent data directory. The steps for creating such an account and private key are given below:
Once you've done that, CompleteAgent should have created two SFTP-based 'file pipelines':
You can test it by copying a file into C:\ProgramData\Enterprise Distributed Technologies\CompleteAgent\Uploads\ToBeUploaded and confirming that it appears in C:\ProgramData\Enterprise Distributed Technologies\Complete FTP\Users\completeAgent. Similarly, you can confirm that any file copied into C:\ProgramData\Enterprise Distributed Technologies\Complete FTP\Users\completeAgent\Downloads will appear in C:\ProgramData\Enterprise Distributed Technologies\CompleteAgent\Downloads\Completed.
Of course, the point is that the client and server can each be anywhere on the Internet, rather than on the same computer, but the transport mechanism is the same as in this example.
Any configuration changes required for CompleteAgent must be done by editing the file, C:\ProgramData\Enterprise Distributed Technologies\CompleteAgent\CompleteAgent.ini.